 Hi folks, here come another free-hand tutorial I've came up with. This time is Ultramarine 2nd Company Banner!! I never thought of going to do a step-by-step tutorial on this existing designed at all until my friend commissioned me to paint for his banner.
 So mind as well don't waste such opportunity.
Now let's grab your brushes and be on with it!!!
BE WARNED!!! For this banner I've mixed both decals and free-hand. Minor people
might not agree with this method and may consider as cheating. But for me with my daily very limited
time allowed, I want to get it DONE FASTER instead of dragging too long. The
longer you drag, the more you couldn't get it done! Trust me..... I know exactly which part will everybody focusing.
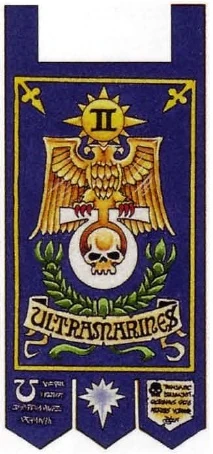
Now let's look at the original design above. Try to decipher how to do it and where to start. I bet on everyone will start with the eagle 1st, then Ultra icon or vise versa.
Before you decide, you need to know which is the hardest and time consuming. For me, I take the Ultra icon is the most time consuming. WHY? Because you will try to paint it like 'U' shape, 'O' shape, or oval shape. Next will be the skull. You will waste a lot of time trying to paint it nice..... IF you can't get it done, you will throw out your work. Trust me! I've been through it....
ULTRA ICON

Step (1) : After I've sprayed a white undercoat on the banner, I painted the base coat with Vallejo Royal Blue.
Step (2) : To NOT waste time, I painted the surface with gloss varnish. Once dried I applied the GW Ultra icon decal and sealed it with gloss varnish. Ultra icon decal comes in various sizes, do measure before apply.
*Decal softener were used.
Step (3) : I used Vallejo Royal Blue to trim the icon to the shape I wanted. Now you can see its more slimmer and look alike with the original designed. If you do not understand about trimming, please refer here.

Step (1) : I outlined the eagle's wing span with OOP GW Iyanden Darksun. You can use any yellow color. Don't worry about any mistakes. You can touch up later.
Step (2) : I filled up the whole eagle with again OOP GW Iyanden Darksun.

Step (3) : Applied a vintage SM Tactical Sq round ring decal. Once dried I sealed it with a coat of gloss varnish. If you don't have this decal, using an old Imperial Fist decal will do.
Step (4) : Filled it up with OOP GW Iyanden Darksun and then painted thorn to make it into iron halo. Start with 3, 6, 9, and 12 o'clock, then the others. Make sure your brush stroke start from the tip of the thorn. Again don't worry about mistakes, you can touch up later.

Step (5) : Lining the eagle's details is the toughest part. You may need to keep cross reference with the original designed. I found it easier to paint the eagle's chest and legs 1st. Only then you go for the feathers which start from outer feathers and slowly go inwards. This will takes you sometimes and do be very very patience!
Step (6) : Once done I layered it with GW Yriel Yellow. Do make sure you leave those crevices area and later you need to shade it. Just cross reference with the original designed and you will know what I meant.

Step (7) : After finding the wings too long, I trimmed it down with Vallejo Royal Blue. Now it looks much better!
Step (8) : I then mixed 1:1 of Vallejo Flat Yellow and White and highlighted the raise areas.

Step (9) : I then added more white to the previous mixed, highlighted the edge part and sharpened it. You can see it looks much better now.
Step (10) : Using thinned down OOP GW Vermin Brown and water (1:5), slowly glazed and shaded the crevices. It takes about 3 layering. Now the eagle and iron halo looks awesome!!

Step (11-12) :Using black to paint the eagle's eyes and claws. Then painted it with red. I then touched up the claws with some white. And then outlined the Ultra Icon with white to make it pop out. DONE!! Wheewwwww....
LAUREL

For this part you can refer to my previous tutorial here. Once you've understood, then it will be much easier. But instead of following my previous tutorial, I modified a little bit.
Step (1) : Using OOP GW Snot Green / Vallejo Deep Green I've painted the center 3 lines knot and semi circle.
Step (2) : After that used previous color to paint the whole laurel's shadow.

Step (3) : I then mixed OOP GW Scorpion Green into previous color. Assuming light shine from top to bottom, I highlighted those edge part. Do make sure its bold enough.
Step (4) : For final highlight, I mixed OOP GW Scorpion Green and a tip Bleached Bone. You can see now it stood out.

Step (5) : To shade it I thinned down the black with water (1:5). Using layering technique and slowly glaze it.
THE RIBBON

For this part you can refer to my previous tutorial here. But instead of following my previous tutorial, I modified a little bit.
Step (1-2): I outlined the ribbon and small parchment with GW Rakarth Flesh and then filled it up. Instead of shading and highlight, I went straight into writing the 'ULTRAMARINES'.

First you may need to count the words. It has 12 words and the center line is between M and A. But if you refer to the original designed, the center is M!?
I broke it down into 3 parts like in my previous tutorial. Started from center I went for right side which was A R I N E S and then finished the rest. Don't worry about mistakes!!

Step (3): I shaded it with water down OOP GW Graveyard Earth and highlighted the edge with mixed 1:1 GW Usabti Bone and white. Using Vallejo Royal Blue to paint the chipped off.
THE SKULL

Step (1) : I applied the skull decal and varnished it. Once dried I painted it with GW Rakarth Flesh.
Step (2) : Using a water thinned down OOP GW Graveyard Earth, I slowly shaded area that bend in (fore head, side, and nose) as follow the original designed above.

Step (3) : Mixed OOP GW Bleached Bone and white, I layered and highlighted the head, eye brow and teeth. Using black, I painted and widened the eye holes, nose hole, and a very thin outlined of it. Too bold outlined will looks weird.
Step (4) : Using a water thinned down black, I slowly shaded area outside the skull. Now you can see that the skull popped out. DONE!!!

And here the finished work!!! The number 'II' is decal; the white star at the bottom are painted as same method with iron halo. Well, hope everyone enjoy this tutorial and find it helpful!!
Comments, questions, and commission work are always welcome...
God, that is great tutorial. thank you very much. need to practice my free hands. and this will give me motivation I need. you're the boss!
ReplyDeleteThank you so much for the appreciation. I'm planning to post a video in future.
DeleteStunning!
ReplyDeleteGreat tutorial :) I've never really tried free-hand and this post provides so many tips.
Freehand painting looks hard and complicated at 1st. You just have to know the tricks that really made it simple and easy. Hope it helps and see your future project.
Delete